Intro: Shifter slop and it’s causes.
This problem is centered around two main areas of ware. Other bushings in the shifter assembly can ware and should be examined and addressed accordingly. Most shifter slop is attributable to the two areas of concern outlined below.
The first is a connection between the shifter assembly and the transmission. This connection is a barrel or cylinder (the shifter part) that fits with close tolerance over a shaft (the input to transmission part). The slop occurs when the shifter connection to the rod gets worn into an oval shape and therefore does not fit correctly on the input shaft.
The second point of slop comes from the lower pivot point of the shifter lever. This cup shaped pivot is dependent on bushings fitted to the end of the shifter lever to maintain a tight tolerance and thus a firm point of pivot.
The Fix: Pivot point
The bushings fitted to the end of the shift lever are still available from a Subaru dealer.
I have used with excellent results the small conical seat from a standard kitchen sink
valve. These are available from any hardware store and fit with minor hole enlargement.
Read drilling.
The part is hard plastic or nylon and looks something like this
(Approx. full size)
![]() When drilled properly it fits very tightly on the end of the shifter, and is fitted
When drilled properly it fits very tightly on the end of the shifter, and is fitted
in the orientation shown (i.e. cone up)
This sits in the pivot "well" and forms a very secure "point of pivot", if you will.
The "well" or socket is cover by a gator (rubber cover), this should be renewed if it is in deteriorated condition. See photo of actual shifter, below)
The Fix: Ovaled Shifter Cylinder.
The cylinder that slides over the shaft (gear selection rod actuator of the transmission), wares into an oval and thus a loose fitting shape. To renew this tolerance fit, a slot is cut in the cylinder and a bolt is used to "clamp" the cylinder to the rod. This effectively removes all play and tightens the shifter to actuator rod permanently.
The lower portion of the shifter must be removed for this process.
Inside the vehicle:
Remove shift boot and remove bolt securing the shifter lever to the part with the cylinder in question.
Under the vehicle:
Remove cotter pin and drive out TWO split pins. Disconnect shifter lever and remove assembly.
The Fix (cont.)
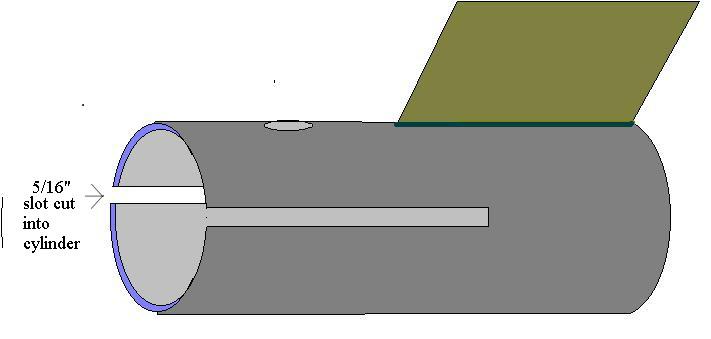
The slot is cut with a band saw or saws all and must extend into the cylinder far enough to allow clamping.
The slot must be approximately 5/16" wide.
When completed the shifter barrel or cylinder will look something like this
(not to any scale what so ever)
 The bolt used to clamp the cylinder to the shaft is a 12 mm (head size, 8 mm shaft)
This fits the original hole and prevents any drilling of the assembly.
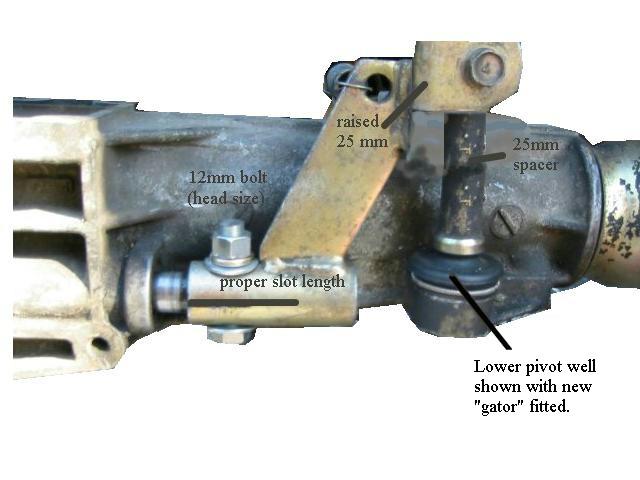
Below is a photo of an actual shifter after the fix
PLEASE NOTE: This picture also shows the method used to shorten the shift throw
by extending the pivot lever point of the shifter assembly. Please disregard this if you do NOT want to incorporate a short shift.
 This treatise offered with no warrantee, batteries are not included and please!!!
By all means – be careful out there.